Monday, August 29, 2011

Still a sewin'!!!

Well, working has one again commenced (sniff, sniff) but I'm stillllllllll sewing! Whrrrrrrrrrrrrrr (that's my sewing machine, if you weren't sure) Having my new sewing room REALLY helps because I can spread out, stay organized, close it all up, and just do a little here and there as I can (though sewing for me is like reading a good book...I burn the midnight oil!) Oh, and it's pretty :)


My skillZ came in handy recently when Bill needed some custom made curtains and video camera covers/accessories. I really didn't know what I was doing, but somehow created patterns and it all worked out! It was definitely different to shop for fabric WITH him!  Here's what we ended up with:


Crazy long curtains made out of moving blankets (they weren't supposed to be pretty, no worries!) NOT FUN!


The camera cover with detachable thingy (official term) on the end to focus light. Or something. I was just the worker- ask him! This is made out of pleather, extra heavyweight stabilizer, and silver vinyl lining. I ended up using bias tape to bind the raw edges since it was so thick!

The inside...! The velcro is for this flap thingy. Yes, thingy.


I don't think I'm starting my own camera cover business or anything, but I was glad to be able to help! I will say that being able to sew is kinda like owning a truck when it's someone's moving day. I can't even believe how many people ask me to make things for them! Even this lady I JUST MET at gymnastics asked me to fix her daughter's tutu (after asking me if I'd made my bag, not that I was touting my skills!) And well, yeah, I fixed it ;)

Until next time...Whrrrrrrrr! :)


Saturday, August 13, 2011

It needed Yo-Yo's!

Ahhh, project completion. I even hand sewed. And I HATE hand sewing! (I of course tried it on my machine, but then decided to follow the directions!!!) Anyway, I first tried a couple different fabric flower ideas, and finally decided on Yo-Yo flowers with little buttons in the center. (For my non-sewing friends, this type of fabric flower is called a yo-yo flower.....it gets used on quilts often!)  It had been a while since I've made one (and my last one wasn't so hot!), so I used Heather Bailey's tutorial HERE and it was really simple actually. I sewed the yo-yos, then put a little button in the middle to cover the raw edges and then sewed them on like buttons! Wa-la!


Final Product (yay!):


Here's a close-up of the Yo-Yo's (I made her yo-yo barrette too over a ribbon covered alligator clip....it's a sparkly button in the middle!)


All in all, a satisfying project! Kara has requested more flower barrettes, so I suppose more hand-sewing is in my future :/  The things we do for those we love! :)

Let me know what you think!

Thursday, August 11, 2011

I think it needs rosettes!?

Lately Kara has really gotten into picking out fabric for her dresses. She actually *likes* going to fabric stores and even gets the "gimmies" as I call it, asking me to buy fabric for her! The other ladies shopping usually are giggling, because it is kinda cute in an annoying "gimmie gimmie" kinda way. The floral fabric in the dress below she INSISTED we buy, and though it wouldn't have been my first pick, I love how it turned out! This is McCalls 5793:

She LOVES bows in the back! Oh, and if you look
closely you'll notice I used a dark fuschsia
thread to sew in the zipper. That was a total blonde
moment, but you know what, the zipper went in
easily and lined up at the yoke/bodice, so oh well! Actually I think you can't tell in this pic which means it's not that obvious, so who cares! :)

I started to add the underskirt with tulle as in the pattern pic (actually I wasn't going to do a full skirt as it's TOO HOT HERE, but was going to do an under ruffle), but it just looked silly (too much!) and I ripped it out. I still feel it needs something, maybe it needs the 3 fabric rosettes (or pretty buttons) in the middle of the little waistband? I think so! I either  need to order some more of that fabric (I'm out!,) unless I find some darker fuchsia that would work and contrast the waistband :)

The cool thing about this dress is that I also used my new serger on it!!! It was my first project where I also incorporated serging, and I am lovin' it! Such nice neat insides, and FAST.  I did the side seams of the dress in one step- serged the seam which finished the seams at the same time. I don't see why not- it didn't need fitting, so why should I sew THEN serge to finish the seams?! I think I'll just keep pink thread on the serger for a while ;)


OH- and I got all crazy and finally learned how to use my ruffler foot (back to the sewing machine, not the serger)- LOVE IT. Why did I not use this previously?!!???!!!  Oh yeah, because I had to watch a bunch of youtube videos to figure it out, that's why! :) I am so thankful to people who take the time to make tutorials and post them! If anyone wants the link to the tutorials I watched, let me know and I'll look them up, though it really took more than one for me to see all my errors. Maybe *I* need to make one ;) Anyway, I'm seeing some tiered ruffle skirts and dresses on the agenda!   


Look at those perfect gathers that I didn't have to do by hand!!!

Thanks for reading and three cheers for floral fabric, sergers, and rufflers! :) I'll post an update when I add the rosettes (or whatever!) :)

Monday, August 8, 2011

Fabric Organization Madness!

I'm not an organized person by nature. In fact, one thing that attracted me to my husband is that when he would visit me in grad school, he would clean up my apartment! Okay, at first that got on my nerves, but I learned to appreciate it ;)  He also used to have typed out labels on his files...sadly (sniff, sniff) this is now a thing of the past, but I digress, that is material for another blog, another place :P

My quest today was to organize the fabric I have collected over the last 2 years, since I learned to sew! Yes, I am a fabric hoarder in such a short period of time! I am turning into my mother, and I admit it. :P

I have fabric here:


okay, and here and here and here:


Sooooooo, since I have redone my sewing room, I am trying to get organized and also make my space pretty! I found this idea for fabric storage using foam board, and decided to go for it! Here are the final results, and I couldn't be more pleased!!!!


Here's how I went about my awesome fabric organization/fabric display redo!

Step 1:
Buy foam boards! I bought mine at Dollar Tree. They are $1 for 20" x 30". Hobby Lobby actually had some for $1.99 and they were 50% off, but they were nicer/thicker, and I decided the Dollar Tree ones would be easier to cut.


Step 2: Cut the foam- each piece will give 8 pieces...they each end up being 7.5" x 10." I used a rotary cutter, but I'm sure an X-acto knife would also work!


this is what you end up with!

Step 3: Fold and fold and fold and fold and roll and roll and roll and roll!!!! Seriously, I was having flashbacks of working at Casual Corner and folding til the wee hours of the night after a huge sale. Anyway, I wrapped the fabric around the foam board and then just pinned it. Careful how you pin though, on small pieces of fabric (since it's not that thick.) I had to play with the pin so I wouldn't get poked!

final result (well, SOME of them!)
sometimes I folded it like this, sometimes i didn't. I'm wild like that! PS I love this fabric!

Step 4: Vow to not buy more fabric until you use up what you have!!!!!!!!!!!

I was originally planning on doing all the fabric that was originally on this shelf (as well as overflow some I pulled out of bins) but as I folded (and folded and folded and folded) I decided not to do everything, and to just roll the pretty cottons/quilting cottons. Getting 60" fabrics and knits around that little board didn't sound so fun, so I just folded the other apparel fabric and knits nicely! I am okay with that :) When I get nicer shelves, I might place the foam boards vertically like library books, but this works for me for now!

Here is the whole shelf that I don't think is too much of an eye sore...actually I love being able to see my pretty fabrics:


I still do have some bins, but they are now more organized and I know where everything is and what I have (TOO MUCH!!!!). I separated my bins into bulky fabrics (fleece, etc), scraps less than 1 yard but still usable for maybe bodices for my 4 year olds dresses (and fat quarters), and baby material/flannel, etc that I buy for random presents I seem to need to make :) 

Happy folding!!!! (PS, please reprimand me if you see a post on Facebook about my going to the fabric store!!!)

Saturday, August 6, 2011

New Sewing Space...New Sewing Attitude!

Wow! I haven't updated here since May of 2010! No, I didn't stop sewing and move to a new hobby...I just got BUSY and posted a bunch of sewing pics to Facebook to people who probably thought I was a sewing psycho. Anyway, I've decided to try this sewing blog thing again, since at least I know whoever reads this might actually sew or care about sewing, or just care about me. Or find this in a random search and become captivated ;)

My latest and probably last major summer project was to revamp my sewing space, AKA storage space, since my sewing machine has actually been taking up space on the dining room table for a year or so now, rather than this supposed sewing space I have upstairs! The room which I revamped was an office/ sewing room/multipurpose storage room that really was scary and unappealing to go in, nonetheless, actually sew in. Soooooo, moved out some furniture, moved in some furniture, painted, sweated, sanded, painted again, sweated a lot (it's 100 degrees here in TX!!!!!!!!), made a valance, hubby made me the pegboard of my dreams (LOVE IT!)), tried to get organized without spending a fortune....and here we have it!  I eventually want to replace the plastic shelves, bins, etc, and need to find a nice way to store my fabric, but hey...it's a HUGE improvement, and I'm excited. Without further ado...


In the pic below, you'll see on the left some half size filing boxes where I sorted and am storing my patterns. They are actually cardboard (and CHEAP!) but I covered the fronts with some scrapbook paper and I think they look pretty cute! The patterns fit in there really well, so I am pleased. Especially, because, as I mentioned- they were CHEAP!

Okay (taking bug gulp)...here's my before pic!

I still am going to figure out a way to organize all my fabric, and I'm thinking of trying an idea I read HERE....maybe that will be my next update to my blog...since I WILL update ;)

Monday, May 17, 2010

Finally found my repurpose!

AHHHHHH--- after a few BUSY weeks, I finally got to sew again. I am in a much better mood...not sure if it's because the end of the college semester is over, or because I created something! Probably a bit of both!

Here are the baby bibs I made out of recycled jeans (see tutorial link in my previous post!) These were SUPER easy and fun to make...The baby I made these for has a Snoopy themed nursery, and when I saw this Snoopy flannel I couldn't resist. I originally planned to use it just for a taggy blanket (pic below), but stumbled upon the bib tutorial and realized I had enough leftover for them. I loved the whole "design" process  and it was fun to pick out the ribbon, etc and do the appliques.

In a nutshell- I just decorated/sewed the fronts, used the printed flannel for the back, added velcro closures, sewed right side together (left space to turn), and used a decorative topstitch to close the hole! FUN, and too cute if I do say so myself!!! :) See tutorial posted in earlier link for more details and the bib  pattern (FREE!)

                                                                             The front:
The back (or front, they really are reversible!):

Here is the taggy blanket! Together I think this makes a CUTE and FUN gift! :) I love giving handmade things, and wish I always had time to do so...it's a goal though!


I LOVE making things for babies and new moms....I didn't sew when I had Kara, but hopefully can have a BLAST when it's time for #2...tick, tick, tick....;)

Thanks for reading! :)

Tuesday, May 4, 2010

Repurposing with a purpose!

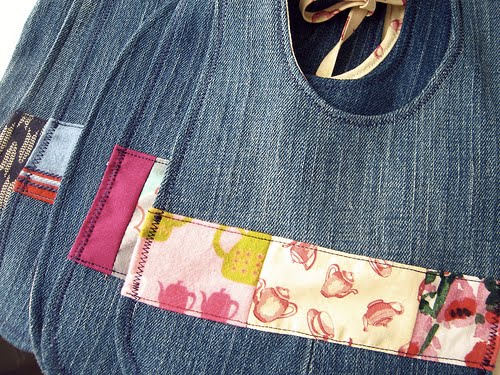
I turned some jeans into shorts the other day and was about to throw away the denim legs, when I thought STOP! I knEW I could do something with them...so I googled and found this:


Those cute denim bibs are made from old jeans! (BTW: The tutorial is here: Denim Bib tutorial)

I MUST make these...especially since I have several friends with new babies and babies on the way!

I want to get better at using my sewing skills to repurpose. I like the idea of using Kara's outgrown clothes to produce new ones.....! I have one pair of her jeans that are too short in my project pile....I'm thinking shorts with maybe some ribbon or ric rac around the bottom? I have some shirts of MINE that are too short...but not sure what I can do with those? There's always Goodwill...but ...but....but....

What are your repurposing ideas?